French Mani With Hearts
French Mani with Hearts - A Sweet Nail Style
Table of Contents:
- Introduction to French Mani with Hearts
- Why Add Hearts to Your French Mani?
- Getting Ready for Your Perfect French Mani with Hearts
- Building the Classic Base for Your French Mani with Hearts
- What are Some Fun Heart Designs for Your French Mani with Hearts?
- Having Trouble with Your French Mani with Hearts?
- How Can You Make Your French Mani with Hearts Last Longer?
- Taking Your French Mani with Hearts to the Next Level
There is something truly special about a classic nail look, isn't there? It is a style that has stood the test of time, giving off an air of simple sophistication. For ages, folks have loved the clean, polished appearance of a traditional French manicure, with its soft, natural base and that crisp, white tip. It is a look that seems to work for nearly any occasion, whether you are heading to a fancy gathering or just keeping things casual for your everyday activities. This particular style has always been a go-to for many, providing a neat and put-together feel to anyone's hands.
But what happens when you want to sprinkle a little bit of extra charm or perhaps a touch of personal flair onto that timeless design? Well, that is where the idea of adding some cute little hearts comes in, creating what we call a "french mani with hearts." It is a delightful twist on something familiar, allowing you to keep that elegant foundation while also expressing a bit of warmth and playfulness. This combination really does open up a whole new world of possibilities for your fingertips, making them feel both polished and sweetly unique. You know, the word 'French' pops up in all sorts of interesting spots, doesn't it? From this lovely nail look we're talking about, to, say, a particular street address or even a language someone might study for a degree, it shows up in many different contexts.
- Amanda Peterson 2014
- Ashley Mcbryde Smoking
- Karen Swift Kids
- Blue I V Y Pregnant
- Why Was Peter Pan Played By A Woman
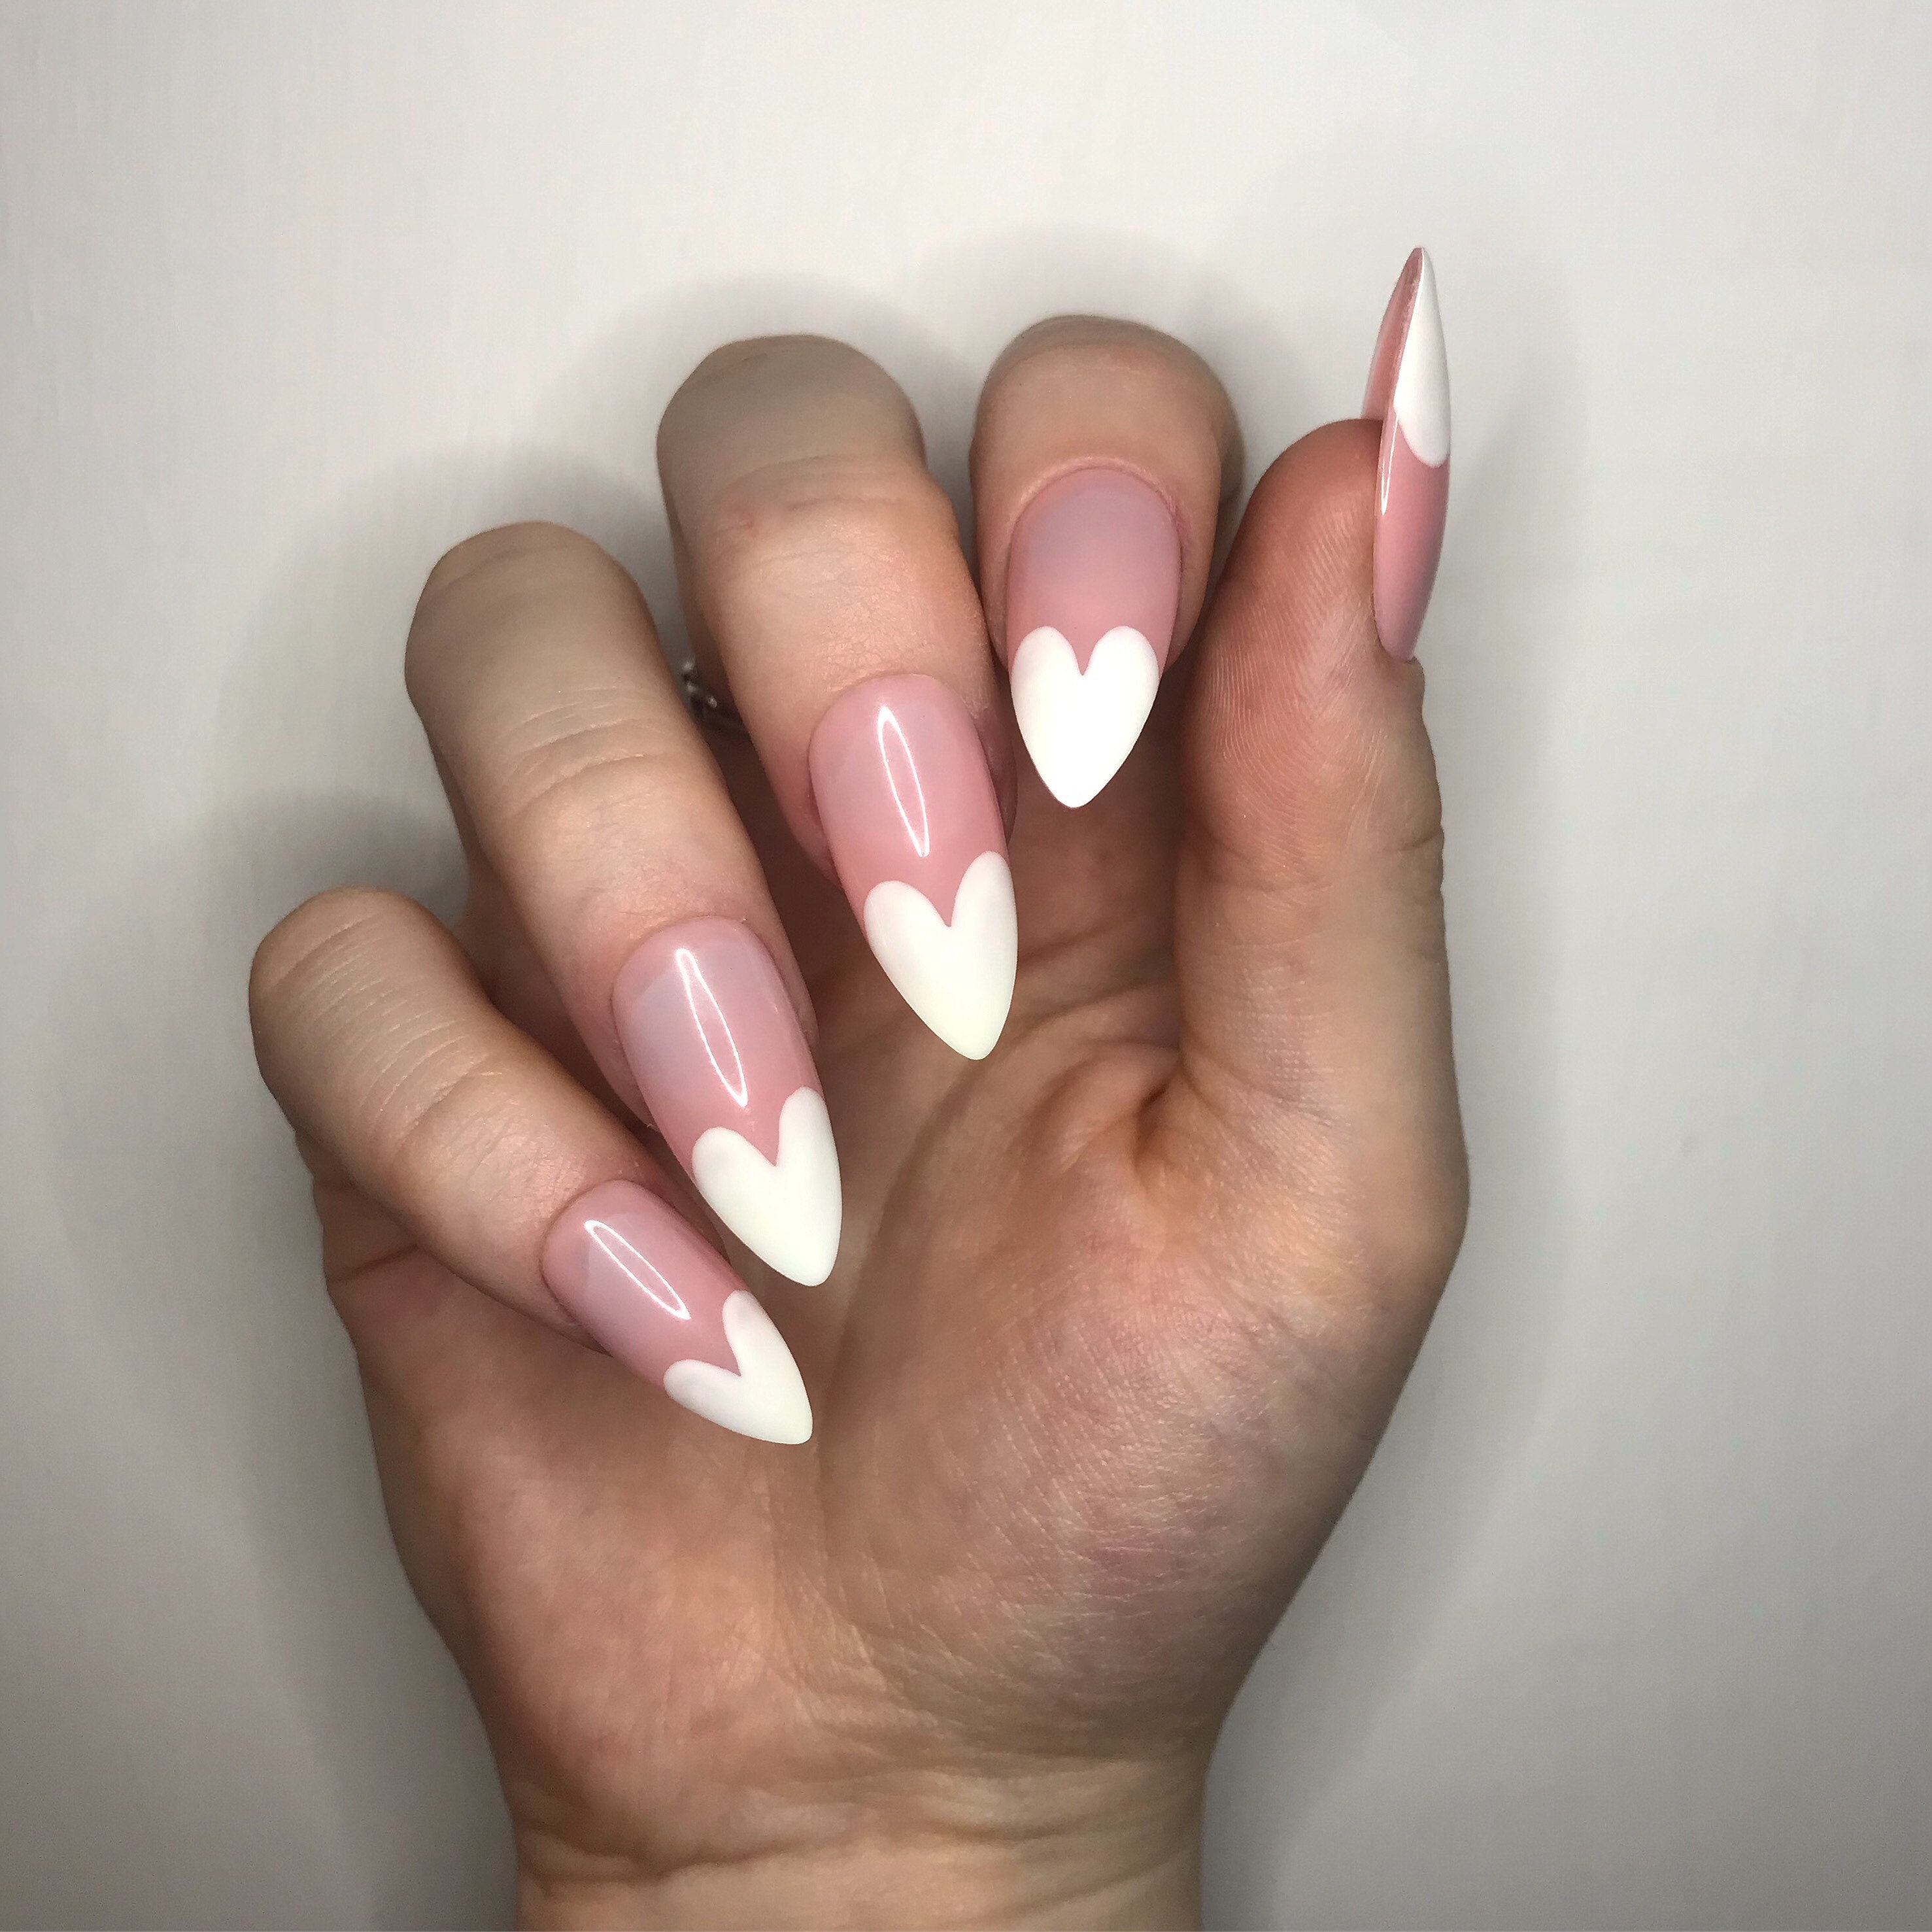
Imagine your nails, so perfectly done, with that familiar clean line, but then, a tiny, charming heart appears, maybe on one finger, or perhaps on every single one. It is a detail that just seems to make people smile, and it adds a touch of personality that you might not get with the plain version. This style, the french mani with hearts, is becoming more and more popular because it blends elegance with a bit of whimsy, allowing you to show off your creative side without going too over the top. It is, in a way, a subtle statement, a little whisper of joy right there on your hands.
Why Add Hearts to Your French Mani?
You might be wondering, why go to the trouble of putting tiny hearts on your nails when the classic look is already so nice? Well, there are actually quite a few reasons why someone might choose this particular design. For one thing, it is a fantastic way to show off a little bit of your own unique style without completely changing the core idea of the French manicure. It is a subtle addition, you know, but one that really makes a difference. The hearts can be a symbol of affection, perhaps for a loved one, or just a general feeling of happiness and warmth that you want to share with the world, or at least with your own hands.
Adding hearts to your french mani with hearts also gives the look a bit more character, making it feel less formal and more approachable. It is like taking something very traditional and giving it a friendly wink. This small detail can completely transform the overall feel of your nails, turning them from simply elegant to something truly endearing. It is also a wonderful choice for special times, like holidays centered around love, or even just as a daily reminder of something sweet. People often find that this small design element can really brighten their day, and perhaps the days of those who notice it too, which is kind of nice.
- Does Alexis Bledel Have Kids
- Justin Bieber Beard
- Nicole Scherzinger Dress
- Michael J Fox Father
- Zach Galifinakis Wife
Moreover, this specific design offers a surprising amount of versatility. You can place the hearts in different spots, make them various sizes, or even use different colors for them, which we will talk about a bit later. This means that while the core idea of a french mani with hearts stays the same, the actual look can be quite different from person to person. It is not just one fixed style; it is a canvas for your own creativity, allowing you to put your own spin on a beloved classic. So, it really is more than just a simple decoration; it is a way to tell a little story with your fingertips, a story of charm and individuality.
Getting Ready for Your Perfect French Mani with Hearts
Before you even think about painting those pretty little hearts, or indeed, applying any nail color at all, getting your nails ready is probably the most important step. Think of it like preparing a canvas for a beautiful painting; you want it to be clean, smooth, and ready to receive the art. This preparation phase for your french mani with hearts really sets the stage for how well your manicure will look and, just as importantly, how long it will last. It is not something you should rush, honestly, because a good start makes all the difference in the end result.
First things first, you will want to make sure your nails are clean. That means removing any old polish, even if it is just a tiny bit left over. Use a gentle polish remover, and then wash your hands thoroughly with soap and water to get rid of any oily residue that might be left behind. After that, it is a good idea to gently push back your cuticles. You can use a wooden stick for this, or a specialized tool, but always be very careful not to push too hard or cut them, as that can actually cause problems. Keeping your cuticles neat helps create a clean line for your French tip, which is, you know, pretty essential for the look.
Next up is shaping your nails. For a traditional French manicure, a slightly squared-off or oval shape tends to work best, but you can choose whatever shape you like most. Use a good quality nail file to gently shape them, always filing in one direction to avoid splitting or weakening the nail. After filing, it is a good idea to buff the surface of your nails very lightly. This helps to smooth out any ridges or imperfections, creating a really nice, even surface for the polish to stick to. This step is often overlooked, but it really does contribute to a professional-looking french mani with hearts, giving it that extra bit of polish.
Building the Classic Base for Your French Mani with Hearts
Once your nails are all prepped and ready, it is time to lay down the foundation for your french mani with hearts. This involves two main parts: the base coat and the natural-looking color for the nail bed. These layers are pretty crucial, not just for the look of your manicure, but also for protecting your natural nails and helping the polish stay on for a longer time. Skipping these steps might mean your beautiful work chips sooner than you would like, which is, you know, a bit of a bummer after all that effort.
Start with a clear base coat. This thin layer acts as a barrier between your nail and the colored polish, helping to prevent staining, especially if you are using darker shades. It also gives the colored polish something to really grip onto, making it last longer. Apply a thin, even coat to each nail, making sure to cover the entire nail surface. Let this layer dry completely before moving on; this usually only takes a few minutes, but it is worth the wait. A slightly tacky base coat is actually perfect for the next step, as it helps the next layer adhere really well, which is quite important.
After the base coat is dry, apply a sheer, natural-looking polish to the entire nail. This is the part that gives the French manicure its characteristic soft, healthy glow. Colors like milky pinks, translucent nudes, or very light peachy tones work wonderfully for this. You might need one or two thin coats to achieve the desired effect, depending on how sheer the polish is and how much coverage you want. Remember to let each coat dry fully before adding another. This patience will pay off, as it helps prevent smudging and ensures an even finish for your french mani with hearts. It is, in some respects, the heart of the whole look.
Now comes the iconic white tip. This is probably the most recognizable part of a French manicure, and it is where many people feel a bit nervous. You can use a special white nail polish designed for tips, or just a regular opaque white. There are a few ways to get that crisp line. Some people use guides or stickers that you place on your nail to create a perfect curve. Others prefer to freehand it with a very fine brush, or even just the brush from the bottle if they have a steady hand. Apply a thin line of white polish along the very edge of your nail, following its natural curve. You might need two thin coats for full opacity. Let this dry completely before doing anything else, as a smudge here could really mess up your french mani with hearts, and that would be a pity, wouldn't it?
What are Some Fun Heart Designs for Your French Mani with Hearts?
This is where the real fun begins, adding those charming hearts to your already lovely French manicure! There are so many ways to incorporate heart designs, allowing you to really make your french mani with hearts truly your own. It is not just about painting a single red heart; you can get quite creative with the size, placement, and even the color of these sweet little symbols. This is arguably the most exciting part, where your personality can truly shine through on your fingertips, which is a nice touch, really.
One very popular option is to paint a tiny, delicate heart on just one accent nail, perhaps your ring finger. This keeps the overall look quite understated and elegant, but still adds that special touch. You could use a classic red for the heart, or maybe a soft pink, or even a metallic shade like gold or silver for a bit of sparkle. Another idea is to place a small heart at the base of each nail, right above the cuticle area, almost like a little jewel. This gives a very sweet and unexpected detail to your french mani with hearts, and it is pretty charming, too it's almost like a secret little surprise.
For those who want a bit more flair, consider painting multiple tiny hearts scattered across one or two nails, creating a playful, confetti-like effect. You could even try different sizes of hearts on the same nail for added visual interest. If you are feeling a bit more adventurous, you might try a heart shape that takes up the entire white tip of one nail, transforming the classic French line into a loving curve. This particular design is a bit more bold, but it can look incredibly striking and unique. Remember, the key is to use a very fine brush or a dotting tool for precision when creating these shapes, which is, you know, pretty important for getting those clean lines.
Color choices for the hearts are also something to think about. While red and pink are traditional, you are certainly not limited to them. Imagine a french mani with hearts featuring a deep burgundy heart for a more sophisticated feel, or a bright blue heart for a playful pop of color. You could even use glitter polish for your hearts, giving them a shimmering, eye-catching quality. The possibilities are, in a way, pretty endless, allowing you to match your heart design to your mood, your outfit, or even a special occasion. This flexibility is what makes this nail art so appealing, allowing for truly personal expression.
Having Trouble with Your French Mani with Hearts?
Even the most experienced nail enthusiasts can run into a few bumps when trying to perfect their french mani with hearts. It is completely normal to face some challenges, especially when working with small details like hearts or trying to get that perfectly crisp French tip. Don't get discouraged if your first attempt isn't exactly what you envisioned; practice really does make a difference here. There are some common issues that people run into, and thankfully, there are usually pretty simple solutions for them, which is nice, honestly.
One common problem is getting a wobbly or uneven French tip. This can happen if your hand isn't steady, or if you apply too much polish at once. If you are struggling with freehanding, try using those adhesive French tip guides. They stick to your nail, leaving just the tip exposed for painting, and then you just peel them off when the polish is dry. Another trick is to use a very thin brush dipped in nail polish remover to clean up any mistakes immediately after you paint the tip. This allows you to refine the line before it dries completely, which is, you know, pretty helpful for a clean look.
When it comes to the hearts themselves, precision is key, and that can be tricky. If your hearts are not coming out as clean or as symmetrical as you would like, it might be that your brush is too big, or you are using too much polish. A very fine detail brush, or even a toothpick for really tiny dots that you can then connect, can make a huge difference. Try practicing on a piece of paper first to get a feel for the tool and the amount of polish you need. Also, make sure the base colors of your french mani with hearts are completely dry before you try to add the hearts, otherwise, you might smudge everything, and that would be a bit frustrating, wouldn't it?
Another issue might be that your polish is bubbling or not drying properly. This can happen if you apply coats that are too thick, or if you are painting in a humid environment. Always apply thin layers, allowing each one to dry thoroughly before the next. If you notice bubbles, try shaking your polish bottle less vigorously; instead, roll it gently between your palms to mix it. And remember, patience is a virtue when doing nail art. Rushing through the drying times can lead to smudges and a less-than-perfect finish for your french mani with hearts, which is, you know, something you want to avoid after putting in all that effort.
How Can You Make Your French Mani with Hearts Last Longer?
You have put in all that effort to create a beautiful french mani with hearts, so naturally, you want it to last as long as possible, right? Keeping your manicure looking fresh and chip-free for several days, or even a week, is totally achievable with a few simple care tips. It is not just about how you apply the polish; it is also about how you treat your nails afterward. These small habits can really make a big difference in the lifespan of your lovely nail art, which is, you know, pretty important for enjoying your work.
The first and perhaps most important step for longevity is applying a good quality top coat. This clear layer acts like a protective shield over your entire design, sealing in your French tip and those sweet little hearts. A top coat adds shine, helps prevent chipping, and can even make your polish dry faster. Apply a fresh coat every two or three days, especially if you are someone who uses their hands a lot. This simple habit can significantly extend the life of your french mani with hearts, making it look freshly done for much longer, which is, honestly, a real time-saver.
Beyond the top coat, being mindful of how you use your hands is pretty crucial. Try to wear gloves when you are doing household chores like washing dishes or cleaning with harsh chemicals. Water and cleaning products can be quite damaging to nail polish, causing it to lift or chip prematurely. Even something as simple as opening a soda can or peeling off a sticker can put stress on your nail tips, so try to use tools or the pads of your fingers instead of your nails whenever you can. It is, in a way, about being gentle with your beautiful work, protecting it from everyday wear and tear.
Keeping your nails and cuticles moisturized also plays a role in manicure longevity. Dry nails are more prone to breaking and chipping, and dry cuticles can make your overall manicure look less polished. Use a cuticle oil daily, massaging it into your cuticles and the skin around your nails. Hand cream is also your friend; apply it regularly, especially after washing your hands. Healthy, flexible nails are less likely to chip, and well-hydrated skin just makes your french mani with hearts look even better, which is, you know, a nice bonus for sure.
Taking Your French Mani with Hearts to the Next Level
Once you have mastered the basic french mani with hearts, why stop there? There are so many exciting ways to take this charming design up a notch, adding even more personality and artistic flair. Thinking outside the box with colors, textures, and even the placement of your hearts can really make your manicure stand out. It is about experimenting and finding what truly speaks to your own sense of style, which is, you know, pretty much what nail art is all about, isn't it?
Consider playing with different colors for your French tips. Instead of the classic white, imagine a soft pastel pink tip with a tiny dark red heart, or a shimmering gold tip with a black heart for a more glamorous feel. You could even try a glitter tip, or a tip made with
- Dakota Johnson And Gwyneth Paltrow
- Plath Childrens Names And Ages
- Pics Of Charles Barkley Daughter
- William And Diana
- Jojo Siwa Ex Gf

Polish Pals: French Tips + Hearts | Nail designs valentines, French tip

Diy White French Tips With Hearts For Valentine’s Day 2023 – The FSHN
French Manicure Hearts Custom Press on Nails | Etsy
